Tuesday, May 15, 2012

Kitchen (Before & After)


Kitchen -  December, 2011

 I have continued working on my house for 9 years and I love it more than ever! Realizing that I am very behind in adding new photos to this blog I decided to show a 'before & after' shot of my kitchen. In the 'bofore' photo you will see all of the cabinets that the kitchen had. To the right of the sink area was a tall radiator and the door to the outside porch. The are where I stood to take the picture is the doorway to the diningroom.  There was room for a free-standing range to the left of where I was standing to take the picture. The refrigerator was located tin a pantry to the far right (not in the kitchen).

Kitchen: 2003
The kitchen went through many evolutions, mainly cosmetic, since cost was always a major factor.  After 9 years, though, I have a wonderfully cozy kitchen in which to cook while I listen to the radio and have a sip of wine! You will notice that, in the 'after' photo, there are more cabinets added!  With my son's help (Blackinton LLC), the door to the back porch was closed off and more cabinets were added.  The cabinets did not match the original ones but, with several coats of black paint and my replacing the hardware, everything looks like they 'belong'!  The gas range that I have now fits in between countertops and my refrigerator is IN my kitchen! yeah!!!  You'll notice the small cart that I have in the middle of my small kitchen.  The space is a bit too small to have it there, but in can be wheeled out of the way if needed.  The reason that I bought it is to provide a fun space for my 2 granddaughters to easily roll out cookie dough!  They are often in my kitchen, helping their "Mimi" bake yummy creations!

Tuesday, September 20, 2011

I can't believe that it has been such a long time since I posted to this particular blog! I have been working on my old house and taking many, many pictures. I hope to upload some this evening or tomorrow.

Tuesday, March 31, 2009

We decided to change the original lines and pitch of the roof. Here is the beginning...
Blackinton Builders did the work.

After having spent all of my "spare" time painting the house I didn't want to leave the garage as it was so, in the last few warm days of October (a few years ago) I spent 5 days scraping paint; priming and painting... at least the garage looked OK from the street... but the rotten areas of the roof and front wall continued to spread. Last fall it was time to have the roof replaced along with the North side...

My garage was a mess... this photo was taken approx. 5 years ago. The photo shows how the garage first looked when I bought the house... I had just started to scrape the peeling paint off of it in this picture.

Monday, May 22, 2006

Fall 2005 - Driveway Paved, House Nearly Painted

The house is all painted in this photo, only the garage and shed are left to paint. I've begun putting some shrubs and perennias into the side gardens.

Driveway excavation- 2004

This photo shows more of what I had painted so far. The front porch took the most time since there was a lot of surface area. Scrapping the peeling paint was the most difficult part of job. The original color the the cedar shingles on the porch was a warm dark brown which clashed horribly with the golden mustard and olive colors. A black solid stain brought the look together and helped bring emphasis to the original stonework foundation, porch columns and exterior chimney (west side of house). We also decided to solve the muddy driveway problems. Aaron rented an excavator from PLT in Pittsfield and prepared the driveway for a basecoat of asphalt. He also increased the driveway area so that we would be able to have room for turning around and parking several vehicles.

Exterior photo October 2004


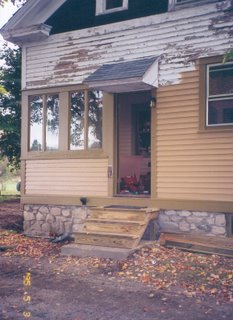
The very first part of the house that I started to paint was this south-east corner. It was late September and the peeling paint was driving me crazy. Since this is the entrance that we use most often it was important to me to make it feel a tiny bit nicer so I quickly scraped the worst sections around the door, scrubbed it and put some white primer up. That made it feel a bit better... I was trying to decide what color I wanted to use once springtime arrived so I experimented with a golden mustardy color for the siding and a bluish olive color for the trim and painted the inside of the small enclosed porch. I wanted to see if I would get sick of the color combination as the winter months passed by. By the time spring came I was sure that I loved the colors and started to tackle the big job of painting the house!
The photo to the left was taken in the fall of 2004. My son was in the middle of replacing the rotten stairs (see previous photo) with sturdy pressure treated ones. You can see the portion of the house that I painted... I had the entire east side of the house painted to the level of the top of the downstairs windows since that was as far as I could reach on the ladder. I knew that one should start at the top and work down but reality sometimes makes one bend the rules! By the fall of 2004 I had this side and the front porch all painted.

Monday, April 17, 2006


I have so many photos taken in the past 2 1/2 years that I don't know where to start. Unfortunately many of my pictures were taken with a 35mm so I need to scan them first... oh well... today I will post some pictures of the east side of the house.

This is a photo taken in September 2003.

Friday, March 31, 2006

Our Craftsman Style House

The theme of this blog will be my old house... It was built in 1870 and purchased by me in September 2003.

The house had been vacant for over a year before my son and I toured the cold, dusty, dirty rooms on a snowy March morning. Devoid of furniture and having just a few working light bulbs, the house did not have an inviting feeling at all. Curb appeal was non-existent...

The basic style is what sold it to us.... It is a classic Craftsman era house with many of the old architectural features still intact. This blog will be used as a diary of the work that Aaron (my son) and I have done on this home of ours. I have many “before and after” photos that I will post.

Monday, July 11, 2005

The beginning...

-From 'Birch'